Pages

Saturday, July 15, 2017

How to Use Inquiry Based Group Research Projects- Step 5

This is the 5th and final post in a series about how to use inquiry based group research projects.  Don't forget your freebie at the end of this post!

We are ready for the last step:

5. Share.


In the last post, I explained how to take the individual sections and combine into one finished group product.  Before beginning the project, you thought about your audience.  Now is the time to share and shine!  Your students will be so excited to share these projects.  Consider setting up a display in the hallway or other common area so that more people can view the projects.

You may also want to have feedback forms available for the audience to respond.  My students were excited to take their finished reports to younger grade levels to share.  We visited a few first grade classes and read our finished reports.

If you have stuck with me through all of these posts, THANK YOU!  Here's a freebie to do your own inquiry based animal reports.  I hope you find it useful.


Please let me know your thoughts, feedback, or ideas on the inquiry based approach.  I would LOVE to hear from you!

Thursday, July 13, 2017

How to Use Inquiry Based Group Research Projects- Step 4

This is the 4th in a series of posts on using inquiry based research projects.  We are ready for the next step:

4. Polish and Publish.
Rubric for the Animal Project
Now that students have completed their section of the project, they will need to double check it for errors and fix anything that stands out.  They can do this on their own or with a partner.  Although my students used a rubric to help them check their work throughout the project, it was a good time to let the group reflect together.

Remind students to think about the audience.  I often tell the writers to look at their project through the eyes of the readers.  It can be difficult for students, especially young students, to edit their work independently.  Providing support through groups and partnerships helps ease this challenge.

Collect the finished papers from each person and sort them into groups according to topic.  In my class, I had 4 groups total (sharks, wolves, snakes, and frogs).  I put the papers in the same order for each group: Appearance, Habitat, Predators and Prey, and Interesting Facts.  Now I had a "book" that could be copied for each person in the group.  If there were 6 people in the wolf group, I made 7 copies of the book.  One for each person to keep and one for the class library.

Because we know that non-fiction books have certain text features that help the reader locate information and understand the text, you may want to have your students add these features to their books.  In my class, we added a table of contents, a glossary page, and an index. We added a laminated cover to each book too. ( The next post includes a freebie with these forms!)

Once you have the projects "published", you will want to share.  I'll talk about that in the next post.

Thanks for sticking with me!


Wednesday, July 12, 2017

How to Use Inquiry Based Group Research Projects- Step 3

This post is the 3rd in a series of posts on how to use inquiry based group research projects.  The previous post covered asking and answering questions.  In this post, we will:

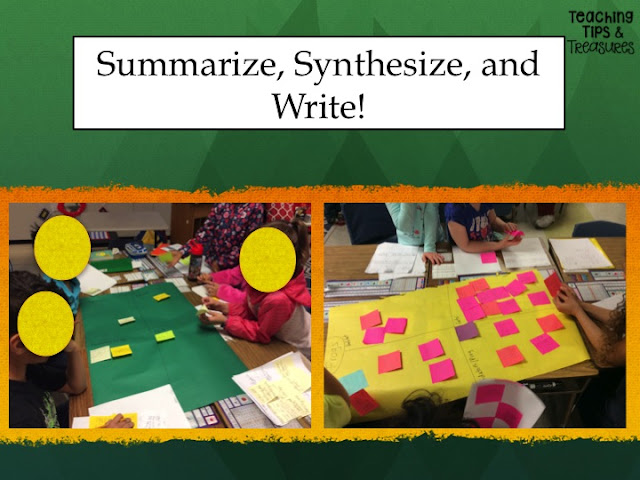
3. Summarize, synthesize, and write.


The next step in the process requires students to work together. At this point in the project, students should have the answers to most of their questions on their post-its.  They may even have additional information they think is important to include.  Although students have been working independently to read and gather information, it is now time for each group to work collaboratively.  Prior to releasing them to their groups, you will want to model the expectations.

For this part, you will need your post-it notes on the topic you are modeling.  As my students are researching animals, I chose to model using turtles as my focus. I also had a large poster sized paper on display.  I gathered the students together as a class and showed how I could group my notes into categories.  I did a "think aloud" as I read some of the post-its and noticed ways they were alike.  I discovered that I could group my post-its into the following categories: Appearance, Habitat, Predators and Prey, and Interesting Facts.

I took a large poster sized paper and divided it into these categories.  Next, I read each post-it and decided where it fit on the poster. After modeling my thinking, I sent the students back into their animal groups to do the same.  Again, everyone was accountable because each person had several post-it notes to categorize.

The great thing about this part of the activity is that the students really have to talk and work together to decide where certain notes will be placed. Also, if there are 2 notes that say the same thing, they have to decide which one to eliminate.  Students will develop their negotiation and compromising skills during this step. Depending on how frequently your students have worked together in the past, you may need to do a mini-lesson on how to respectfully and politely discuss ideas.  This part of the project can be difficult for some students.  You will want to teach those students how to compromise.

One interesting thing that happened with one of my groups was that 2 students found conflicting information in different texts.  One source stated a certain speed that a wolf could run while another book gave a different number.  This led to a great discussion on why they thought that happened. They also talked about how to decide which fact to include.  As the facilitator of this lesson, I just prompted by asking questions.  I left the decision making up to the group.

Once all of the notes are sorted, it's time to assign individual roles to the group project.  Each person in the group will become accountable for one category.  In some cases you may have 2-3 students assigned to one category.  In a six person group, I  assigned 1 person to Appearance, 1 to Habitat, 2 to Predators and Prey, and 2 to Facts.  Again, although this is a group project, there is individual accountability.

Remember that all of the group's notes have been sorted and categorized on a large poster.  Each group's poster will need to be cut apart so that individuals can work on their section of the project.
The person (or people) will be responsible for taking all of the notes for their category and synthesizing the information.  They will need to write a paragraph or page (depending on the amount of information gathered) that will be shared with all of the members of their group.  The need for neat writing and use of conventions becomes critical here.  Students have to write legibly and coherently because their team is depending on them!  (more on that in the next post)

This is another step that needs to be explicitly modeled.  Using my own information about turtles, I showed the students how I thought of a question to guide me for each category.  For example, when looking at the "Appearance" section, I needed to answer, "What does a turtle look like?"  Keeping the question in mind will help the students stay focused on writing about their topic which is the next step.

This is where another shift in the project will occur.  You will want to meet with all of the students who are responsible for the same category as one group. For example, there was one person from the shark groups, one from the wolf group, etc. who was assigned to work on "Appearance."  By working with small groups you can provide support and modeling when needed.  I usually met with these small groups during our Daily 5 time.  Think about what mini-lessons these groups will need.  How will you model synthesizing the information?  You may decide to model these lessons to the whole class as one group, or you may differentiate the lessons based on what each small group needs.

So, let's look at what has happened so far.  We started with a broad topic: animals.  Students were then assigned one animal to research.  This created 4 smaller groups.  Each person in the group had to think of questions and gather information related to their animal.  These questions and answers were pulled together on a large poster sized chart and grouped into the following categories: Appearance, Habitat, Predators and Prey, and Interesting Facts.  Students were then assigned one category from the poster.  Next students used all of the notes gathered by their group to work on one section of the project.  The next step will bring the individuals back to the group.

In the next post, I will explain how to bring the pieces together and polish and publish the project.

Thanks for stopping by!

Tuesday, July 11, 2017

How to Use Inquiry Based Group Research Projects- Step 2

This is the second in a series of posts on how to implement an inquiry based group research project. In the first post, I explained the power of the project and the first step in the plan.  Today I am going to share how to...

2. Gather information by asking and answering questions.


Once you have your topics and resources, you'll want to get the students motivated and excited about the project.  They will be eager to get started and you will want to capitalize on that.  You will want to provide an area for each group to meet and have access to their resources.  I had a basket of books for each different animal the students were researching. (wolves, sharks, snakes, and frogs)

Although each group is gathered together, they will still be working independently on the next part. However, by sitting with their group, they can support one another and model for one another. By having the students sit with each other in my class and share the resources, the students were able to share interesting discoveries and questions.  It became a team effort to find the answer to some of the questions.

I suggest just giving them time to explore the resources that you have gathered.  I wanted to get the kids thinking about what they knew and what they wanted to know.  Rather than starting off with a KWL, I just gave them time to look at the books in their tubs and talk with their team members.  This was my way of getting their brains focused on the topic and generating excitement.  I hadn't asked them to do any real "work" yet.  This got them naturally thinking, talking, and questioning.

Next, you will want to gather the class as a whole group.   One of the biggest factors that impacts the success of this project is the gradual release of responsibility.  You can't just turn the kids loose and expect they will know what to do. (Yep, I tried that before too.  It flopped.)  So the next thing I did is model for the whole class "asking questions."  I didn't want to model using one of the animals the kids had selected, so I decided to model using turtles.

I had 2 sheets of paper with post-it note sized boxes on it.  In these boxes, I wrote questions about turtles.  Of course, I modeled the process through a think aloud as the students observed.  I explained that these question sheets would be used to guide my research.  You may want to determine a certain number of questions that each student must have or just set aside a certain amount of time for asking questions and recording them on post-its.  In my class, we set aside 2 days for thinking and recording questions.

At this point in the group project, students are working independently.  Each student is held accountable because he or she is expected to be thinking about questions they have about the topic. In my classroom, each student was expected to write a minimum of 6 questions.   This way, not one person in a group is doing all of the work or asking all of the questions.


Once students have recorded several questions, they are ready to read and gather information. This part of the process should take 2-3 days as well. That all depends on how much class time you devote to the project and if you allow students to work on it during other times of the day. Although we typically worked for about 45 minutes each day as a whole class, many students chose to continue questioning, reading, and gathering information during Daily 5.  They were working on this project by choice!

You will need to think about what mini-lessons need to be modeled during this project.  For my students, I modeled several things including: how to use non-fiction text features to locate information, how to read and summarize a passage or text, how to determine the most important information, and what to do when you read conflicting information. ( more on that later)

As students read, they will write down on post-it notes the answers to questions that they find. Then cover up the question with the post-it note.  This helps students to see what questions still need to be answered.  One lesson my students learned during this part of the process is that sometimes we can't find the answers to all of our questions.  As researchers, that is bound to happen.  We have to decide whether or not we want to spend more time trying to locate the answer to a certain question or just let it go.

Another thing to prepare for is that students will find interesting facts that do not necessarily relate to their questions.  This is a time for a lesson on determining importance.  Students will have to decide if that information is worth recording and using in their project.

After giving your students a few days to gather information by asking and answering questions, you will be ready for the next step in the process.  My next post will give details about the responsibility of each person in the group and how that group comes together.

Thanks for stopping by!

Monday, July 10, 2017

How to Use Inquiry Based Group Research Projects- Step 1

Collaboration, negotiation, and compromise. Although these may be considered "soft skills",  the development of these skills is critical to the success of our students in the 21st Century. In this series of posts, I'll share how to meet multiple language arts, science, and social studies standards with one engaging project that also helps students develop important life skills.


With so much to teach, we have to be fiercely protective of our instructional time. An inquiry based group research project is a great way to teach so much: asking questions, determining importance, summarizing, finding the main idea, synthesizing, non-fiction text features, writing conventions... not to mention the science and social studies content the students are learning!  As a bonus, students are learning real life skills like collaboration, negotiation, and compromise. Whew!   Now that's a powerful project!

Here's what you need to do to get started:

1. Pick the topics, determine groups, and gather resources.

There are so many topics that could be used for this research project. You can start by looking at your standards or just asking your kids what topics they are interested in learning about.  Knowing that my students loved to learn about animals, I chose this as a topic for our inquiry project.  We discussed ideas and voted for 4 that we wanted to research. We had to narrow the focus to make it more manageable. The students decided to research frogs, sharks, wolves, and snakes.

Once you have determined the focus of your research, you will want to divide the students into groups.  You can assign the groups or let them choose.  I like giving choice because it motivates the students even more.

Next, gather resources that your students will need to complete the project.  Depending on the age of your students, finding appropriate resources could be part of the project itself.  In my second grade classroom, I gathered books (at a large range of reading levels) and magazines that my students could use and placed them into bins.  You may also want to consider digital resources.  We used "Facts4Me" for one.

I would also recommend picking a separate topic that you as the teacher can use for modeling purposes.  I picked turtles as my animal to use for modeling.  The gradual release of responsibility is so important!

You will also need to consider your audience and final product.  Creating a rubric together or providing one to guide the students is a good way to keep the project on track. Will students be creating a book or report?  How about a mural?  Maybe student creations will be shared digitally. Who will see or read these creations?  Keeping your audience and final product in mind helps guide the project and keeps the students motivated.  You will want to have this discussion with your students.  Again, when students have some choice in the direction and purpose of the project, they are typically more engaged.

Now that you have your topics, your groups, and your resources, you are ready to begin!  My next post will explain how to model asking and answering questions.

Follow me in this series to learn how to:
1) Pick the topics, determine groups, and gather resources.
2) Gather information by asking and answering questions.
3) Summarize, Synthesize, and Write!
4) Polish and Publish
5) Share

**If you stick with me until the end of this series, I will have a freebie for you! Follow me to get the updates!