Pages

Saturday, July 15, 2017

How to Use Inquiry Based Group Research Projects- Step 5

This is the 5th and final post in a series about how to use inquiry based group research projects.  Don't forget your freebie at the end of this post!

We are ready for the last step:

5. Share.


In the last post, I explained how to take the individual sections and combine into one finished group product.  Before beginning the project, you thought about your audience.  Now is the time to share and shine!  Your students will be so excited to share these projects.  Consider setting up a display in the hallway or other common area so that more people can view the projects.

You may also want to have feedback forms available for the audience to respond.  My students were excited to take their finished reports to younger grade levels to share.  We visited a few first grade classes and read our finished reports.

If you have stuck with me through all of these posts, THANK YOU!  Here's a freebie to do your own inquiry based animal reports.  I hope you find it useful.


Please let me know your thoughts, feedback, or ideas on the inquiry based approach.  I would LOVE to hear from you!

Thursday, July 13, 2017

How to Use Inquiry Based Group Research Projects- Step 4

This is the 4th in a series of posts on using inquiry based research projects.  We are ready for the next step:

4. Polish and Publish.
Rubric for the Animal Project
Now that students have completed their section of the project, they will need to double check it for errors and fix anything that stands out.  They can do this on their own or with a partner.  Although my students used a rubric to help them check their work throughout the project, it was a good time to let the group reflect together.

Remind students to think about the audience.  I often tell the writers to look at their project through the eyes of the readers.  It can be difficult for students, especially young students, to edit their work independently.  Providing support through groups and partnerships helps ease this challenge.

Collect the finished papers from each person and sort them into groups according to topic.  In my class, I had 4 groups total (sharks, wolves, snakes, and frogs).  I put the papers in the same order for each group: Appearance, Habitat, Predators and Prey, and Interesting Facts.  Now I had a "book" that could be copied for each person in the group.  If there were 6 people in the wolf group, I made 7 copies of the book.  One for each person to keep and one for the class library.

Because we know that non-fiction books have certain text features that help the reader locate information and understand the text, you may want to have your students add these features to their books.  In my class, we added a table of contents, a glossary page, and an index. We added a laminated cover to each book too. ( The next post includes a freebie with these forms!)

Once you have the projects "published", you will want to share.  I'll talk about that in the next post.

Thanks for sticking with me!


Wednesday, July 12, 2017

How to Use Inquiry Based Group Research Projects- Step 3

This post is the 3rd in a series of posts on how to use inquiry based group research projects.  The previous post covered asking and answering questions.  In this post, we will:

3. Summarize, synthesize, and write.


The next step in the process requires students to work together. At this point in the project, students should have the answers to most of their questions on their post-its.  They may even have additional information they think is important to include.  Although students have been working independently to read and gather information, it is now time for each group to work collaboratively.  Prior to releasing them to their groups, you will want to model the expectations.

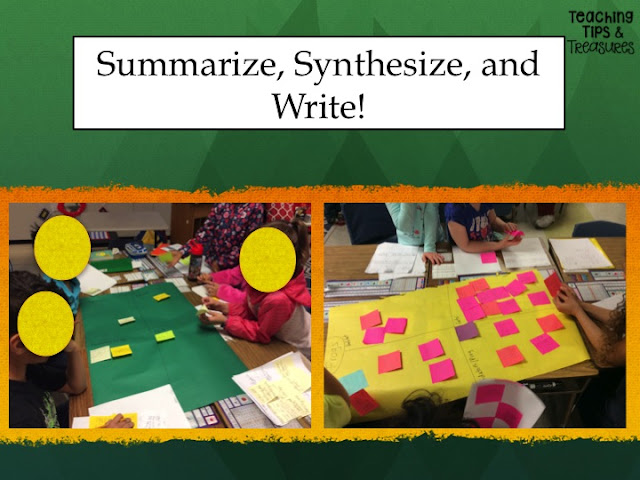
For this part, you will need your post-it notes on the topic you are modeling.  As my students are researching animals, I chose to model using turtles as my focus. I also had a large poster sized paper on display.  I gathered the students together as a class and showed how I could group my notes into categories.  I did a "think aloud" as I read some of the post-its and noticed ways they were alike.  I discovered that I could group my post-its into the following categories: Appearance, Habitat, Predators and Prey, and Interesting Facts.

I took a large poster sized paper and divided it into these categories.  Next, I read each post-it and decided where it fit on the poster. After modeling my thinking, I sent the students back into their animal groups to do the same.  Again, everyone was accountable because each person had several post-it notes to categorize.

The great thing about this part of the activity is that the students really have to talk and work together to decide where certain notes will be placed. Also, if there are 2 notes that say the same thing, they have to decide which one to eliminate.  Students will develop their negotiation and compromising skills during this step. Depending on how frequently your students have worked together in the past, you may need to do a mini-lesson on how to respectfully and politely discuss ideas.  This part of the project can be difficult for some students.  You will want to teach those students how to compromise.

One interesting thing that happened with one of my groups was that 2 students found conflicting information in different texts.  One source stated a certain speed that a wolf could run while another book gave a different number.  This led to a great discussion on why they thought that happened. They also talked about how to decide which fact to include.  As the facilitator of this lesson, I just prompted by asking questions.  I left the decision making up to the group.

Once all of the notes are sorted, it's time to assign individual roles to the group project.  Each person in the group will become accountable for one category.  In some cases you may have 2-3 students assigned to one category.  In a six person group, I  assigned 1 person to Appearance, 1 to Habitat, 2 to Predators and Prey, and 2 to Facts.  Again, although this is a group project, there is individual accountability.

Remember that all of the group's notes have been sorted and categorized on a large poster.  Each group's poster will need to be cut apart so that individuals can work on their section of the project.
The person (or people) will be responsible for taking all of the notes for their category and synthesizing the information.  They will need to write a paragraph or page (depending on the amount of information gathered) that will be shared with all of the members of their group.  The need for neat writing and use of conventions becomes critical here.  Students have to write legibly and coherently because their team is depending on them!  (more on that in the next post)

This is another step that needs to be explicitly modeled.  Using my own information about turtles, I showed the students how I thought of a question to guide me for each category.  For example, when looking at the "Appearance" section, I needed to answer, "What does a turtle look like?"  Keeping the question in mind will help the students stay focused on writing about their topic which is the next step.

This is where another shift in the project will occur.  You will want to meet with all of the students who are responsible for the same category as one group. For example, there was one person from the shark groups, one from the wolf group, etc. who was assigned to work on "Appearance."  By working with small groups you can provide support and modeling when needed.  I usually met with these small groups during our Daily 5 time.  Think about what mini-lessons these groups will need.  How will you model synthesizing the information?  You may decide to model these lessons to the whole class as one group, or you may differentiate the lessons based on what each small group needs.

So, let's look at what has happened so far.  We started with a broad topic: animals.  Students were then assigned one animal to research.  This created 4 smaller groups.  Each person in the group had to think of questions and gather information related to their animal.  These questions and answers were pulled together on a large poster sized chart and grouped into the following categories: Appearance, Habitat, Predators and Prey, and Interesting Facts.  Students were then assigned one category from the poster.  Next students used all of the notes gathered by their group to work on one section of the project.  The next step will bring the individuals back to the group.

In the next post, I will explain how to bring the pieces together and polish and publish the project.

Thanks for stopping by!

Tuesday, July 11, 2017

How to Use Inquiry Based Group Research Projects- Step 2

This is the second in a series of posts on how to implement an inquiry based group research project. In the first post, I explained the power of the project and the first step in the plan.  Today I am going to share how to...

2. Gather information by asking and answering questions.


Once you have your topics and resources, you'll want to get the students motivated and excited about the project.  They will be eager to get started and you will want to capitalize on that.  You will want to provide an area for each group to meet and have access to their resources.  I had a basket of books for each different animal the students were researching. (wolves, sharks, snakes, and frogs)

Although each group is gathered together, they will still be working independently on the next part. However, by sitting with their group, they can support one another and model for one another. By having the students sit with each other in my class and share the resources, the students were able to share interesting discoveries and questions.  It became a team effort to find the answer to some of the questions.

I suggest just giving them time to explore the resources that you have gathered.  I wanted to get the kids thinking about what they knew and what they wanted to know.  Rather than starting off with a KWL, I just gave them time to look at the books in their tubs and talk with their team members.  This was my way of getting their brains focused on the topic and generating excitement.  I hadn't asked them to do any real "work" yet.  This got them naturally thinking, talking, and questioning.

Next, you will want to gather the class as a whole group.   One of the biggest factors that impacts the success of this project is the gradual release of responsibility.  You can't just turn the kids loose and expect they will know what to do. (Yep, I tried that before too.  It flopped.)  So the next thing I did is model for the whole class "asking questions."  I didn't want to model using one of the animals the kids had selected, so I decided to model using turtles.

I had 2 sheets of paper with post-it note sized boxes on it.  In these boxes, I wrote questions about turtles.  Of course, I modeled the process through a think aloud as the students observed.  I explained that these question sheets would be used to guide my research.  You may want to determine a certain number of questions that each student must have or just set aside a certain amount of time for asking questions and recording them on post-its.  In my class, we set aside 2 days for thinking and recording questions.

At this point in the group project, students are working independently.  Each student is held accountable because he or she is expected to be thinking about questions they have about the topic. In my classroom, each student was expected to write a minimum of 6 questions.   This way, not one person in a group is doing all of the work or asking all of the questions.


Once students have recorded several questions, they are ready to read and gather information. This part of the process should take 2-3 days as well. That all depends on how much class time you devote to the project and if you allow students to work on it during other times of the day. Although we typically worked for about 45 minutes each day as a whole class, many students chose to continue questioning, reading, and gathering information during Daily 5.  They were working on this project by choice!

You will need to think about what mini-lessons need to be modeled during this project.  For my students, I modeled several things including: how to use non-fiction text features to locate information, how to read and summarize a passage or text, how to determine the most important information, and what to do when you read conflicting information. ( more on that later)

As students read, they will write down on post-it notes the answers to questions that they find. Then cover up the question with the post-it note.  This helps students to see what questions still need to be answered.  One lesson my students learned during this part of the process is that sometimes we can't find the answers to all of our questions.  As researchers, that is bound to happen.  We have to decide whether or not we want to spend more time trying to locate the answer to a certain question or just let it go.

Another thing to prepare for is that students will find interesting facts that do not necessarily relate to their questions.  This is a time for a lesson on determining importance.  Students will have to decide if that information is worth recording and using in their project.

After giving your students a few days to gather information by asking and answering questions, you will be ready for the next step in the process.  My next post will give details about the responsibility of each person in the group and how that group comes together.

Thanks for stopping by!

Monday, July 10, 2017

How to Use Inquiry Based Group Research Projects- Step 1

Collaboration, negotiation, and compromise. Although these may be considered "soft skills",  the development of these skills is critical to the success of our students in the 21st Century. In this series of posts, I'll share how to meet multiple language arts, science, and social studies standards with one engaging project that also helps students develop important life skills.


With so much to teach, we have to be fiercely protective of our instructional time. An inquiry based group research project is a great way to teach so much: asking questions, determining importance, summarizing, finding the main idea, synthesizing, non-fiction text features, writing conventions... not to mention the science and social studies content the students are learning!  As a bonus, students are learning real life skills like collaboration, negotiation, and compromise. Whew!   Now that's a powerful project!

Here's what you need to do to get started:

1. Pick the topics, determine groups, and gather resources.

There are so many topics that could be used for this research project. You can start by looking at your standards or just asking your kids what topics they are interested in learning about.  Knowing that my students loved to learn about animals, I chose this as a topic for our inquiry project.  We discussed ideas and voted for 4 that we wanted to research. We had to narrow the focus to make it more manageable. The students decided to research frogs, sharks, wolves, and snakes.

Once you have determined the focus of your research, you will want to divide the students into groups.  You can assign the groups or let them choose.  I like giving choice because it motivates the students even more.

Next, gather resources that your students will need to complete the project.  Depending on the age of your students, finding appropriate resources could be part of the project itself.  In my second grade classroom, I gathered books (at a large range of reading levels) and magazines that my students could use and placed them into bins.  You may also want to consider digital resources.  We used "Facts4Me" for one.

I would also recommend picking a separate topic that you as the teacher can use for modeling purposes.  I picked turtles as my animal to use for modeling.  The gradual release of responsibility is so important!

You will also need to consider your audience and final product.  Creating a rubric together or providing one to guide the students is a good way to keep the project on track. Will students be creating a book or report?  How about a mural?  Maybe student creations will be shared digitally. Who will see or read these creations?  Keeping your audience and final product in mind helps guide the project and keeps the students motivated.  You will want to have this discussion with your students.  Again, when students have some choice in the direction and purpose of the project, they are typically more engaged.

Now that you have your topics, your groups, and your resources, you are ready to begin!  My next post will explain how to model asking and answering questions.

Follow me in this series to learn how to:
1) Pick the topics, determine groups, and gather resources.
2) Gather information by asking and answering questions.
3) Summarize, Synthesize, and Write!
4) Polish and Publish
5) Share

**If you stick with me until the end of this series, I will have a freebie for you! Follow me to get the updates!

Thursday, June 15, 2017

Getting Personal

Who doesn't love connecting with other people?  I enjoy hearing about the personal side of the bloggers I follow.  I haven't really shared much in that arena, although I am going to try to do better. One of these days I might even try Facebook or Instagram.  (Whoa!  That makes me get the shakes...)

So here it goes...  Personal stuff...

I really do have a good sense of humor.  But the things I think are really funny are not necessarily appropriate for a teacher blog.  I haven't figured out how to let my humor show in my blog without getting into trouble.  I've been using a really strong filter so far.  ðŸ˜Ž

We have a lot of "fun" days in our school.  I don't know who enjoys the dressing up more, the teachers or the kids!

I think this was for "Wacky Wednesday."


Ugly Sweater day in December.  I won a prize!
We have a really fun staff.  I love the diversity in ages and personalities.  It keeps things fresh and exciting.
This was a during teacher appreciation week.

Last year, one of our fabulous first grade teachers taught us how to dance to "Thriller."  We performed in the talent show.


I'll share some more stuff in the future.  I just needed to break the ice a bit with "getting personal."  Thanks for stopping by!

Thursday, June 1, 2017

Camping Themed Fun and Some Freebies

If you are looking for some camping themed ideas, I've got you  covered!

Each year, in the last few weeks of school, our school has "Camp Read-A-Lot."  We decorate the front entrance, bring in tents and camping supplies, and plan a week of camping themed fun.  I think the teachers love it as much as the kids.  I know I do!

One fun activity we did this year was play the headbands game.  The kids loved it!  We played as a whole class, but you could play in small groups also.


In math, we did some graphing activities based on student choices of tent or camper.  We also voted for our favorite camping food.  Then we did some opinion writing about our choices.


We also made class books with a camping theme.  The kids were very motivated by the topics and wrote some great stories!

On the last day, we had a scavenger hunt with clues that led us around our school.  It ended in the courtyard where we found some fun treats to take home.

Here are some links to my camping themed products on TPT:


Here are some camping freebies for you:


I love our camping themed fun!!  Do you do any fun camping themed activities in your school or classroom?  Please share!


Saturday, April 22, 2017

Building Character Schoolwide

How does your school address character education?  In my district, we have a character education committee that plans some of the activities that we do each year.  We also work at the building and classroom levels to incorporate character education into our teaching.


One way our school supports positive behavior and/or good character is by using "Character Rocks." The rocks are small flat stones that can be purchased at craft stores.  Each teacher or staff member has a supply to hand out when they notice students exhibiting great behavior or showing good character. Students can earn these rocks in their own classrooms or anywhere on school grounds.

Each classroom has a container for collecting the rocks.  At the end of each month, the rocks earned by each grade level are collected and counted.  The grade level with the most rocks for the month earns some type of reward.  In the past, it has been things like extra recess, a popsicle, or a "craft day" in the multi-purpose room.

The display that you see above shows each grade level's current count.  There is a key at the bottom of the display that tells that each colored circle stands for 5 rocks.  The star next to second grade indicates that grade earned the most rocks in the previous month.  Although second grade has the star for the month, kindergarten is in the lead for most rocks earned.

I love that our school has a universal way to recognize good character.  The students really take pride in earning "Character Rocks."  I  am not sure who came up with the idea for the display above, but I love it!

How does your school or classroom recognize good character?

Saturday, April 15, 2017

Revision Success- Tips to Help Young Writers

Revision can be a difficult process for young writers to grasp.  Though part of the writing process, it's not frequently done with enthusiasm, especially by primary grade writers. It's hard enough for these little darlings to get their thoughts out the first time.  "Now you want me to change or add more?  But I'm done." How can you avoid this frustration and still have kids experience revision?


One key point is to get into the writing BEFORE the student is "finished."  I hate to admit this, but until the last few years, I often conferred with students just at the end of the writing process.  When a student had a completed piece, I would meet with them and offer suggestions.  Now I see the error of my ways! I have learned to confer early in the process and ask questions instead of offer suggestions.

When I am conferring with students, I often ask "What is the one thing you want your readers to remember after hearing your story?  What sort of sums it all up?'  If you are teaching with the traits, they already know about having one clear message and thinking about their audience and purpose. If they can't really answer those questions, and it's not clear in the piece, I need to ask some more questions to help the writer uncover his or her focus.

I also ask, "Who is this piece for?  Who do you think would want to hear or needs to hear this piece?" I am trying to get the writer to think about the audience.  Considering the audience helps the writer strengthen his or her voice in the piece.  Connecting with the reader is an important goal for the author.

Here's an example that recently occurred in my second grade class.  While conferring with a writer, I noticed her piece seemed to lack a clear message.  It appeared to be a list of things she did in the day. (I call these "list" writings.  Others call them "bed to bed" stories.)  She wrote "First I do ….., then I do…after that I do…."  It was not a very captivating story to say the least.  I was wondering where she was headed with this piece.

At first, I didn't think she had any real message in mind while she was writing.  I think of these stories like diary entries.  This is usually what I tell the kids too. Sometimes I write things like that in my diary because I want to recall things I did on a certain day.  But those are not stories that anyone other than me would want to read.  It doesn't mean I can't write them. I just don't expect to share them.

One of the things she told me was that the writing was for other kids to learn.  As I  talked to her, I got the feeling that she had something else in mind when writing her piece.  When I  started asking more direct questions, she revealed that the heart of her piece was  really a lesson.  She wanted other kids to know that they should get their work done before playing.  The lesson was "Put first things first" so to speak.  She had not yet mentioned that anywhere in her piece though.  Through questioning, we were able to uncover her one clear main idea.

We talked about what she could do to make her message more clear.  She was very motivated to go back and add some new details to her piece.  She really just adjusted her beginning to include a few more direct statements.  These adjustments also made it easier for her to end the piece.  She now knew what her concluding statement should be. It made a HUGE difference in the quality of her writing.  She was so proud to share and to explain how she had revised her work.

By conferring with her while she was still drafting, she was much more willing to revise.  Revision does not only come at the end!  Asking questions helped her to reflect on her piece and find places where changes would improve her message.

Do you have any tips for revision?  What questions do you ask writers?

Thursday, March 30, 2017

Poetry Packs a Powerful Punch!

April is National Poetry Month!  Although we will do some special poetry related activities during the month, we also enjoy poetry throughout the year.

We start every day with a poem displayed on the Smart Board.  It's there from the moment the students walk in.  I keep the same poem up for one week as we use it for repeated readings, phonics, and vocabulary work.

I like using poems in this way for several reasons.  First, kids like them!  They are short and often funny.  Even reluctant readers enjoy reading these poems.  They feel a sense of accomplishment when they are able to read an entire piece independently from start to finish.  It's a great way to build fluency skills as we read and reread every day.  It only takes a few minutes at the beginning of our day.


After announcements are finished, we read the poem together one time as a class.  This choral reading supports everyone, even those who may find the reading challenging at first.  Next, I choose 1 person to read it alone.  This is always voluntary.  We often talk about expression, rate, and attending to punctuation in the poem as we read.

Each day I pick one small area to focus on.  For example, we might look for certain "hunks and chunks"or spelling patterns.  We will underline them and discuss what we see.  We also might choose 1-2 words as vocabulary development.  Poetry provides a rich resource for interesting words.

The whole process takes about 5 minutes out of our day but provides many opportunities for learning.  In addition to seeing the poems on the Smart Board, I have each poem printed and bound into a book for the students.  They keep them in their book boxes and use them during Daily 5.  Again, it's a great way to develop fluency skills, and it's fun!

How do you use poetry in your class?  I would love to hear more ideas!

Monday, March 27, 2017

Positive Parent Partnerships

We all dread having to make a phone call to a parent that is NOT so positive.  It's a reality that every teacher faces from time to time.  You can increase the odds that you will get parental support by taking a few steps throughout the year to build a positive relationship with your parent partners.

One of the first things I do at the beginning of the year is invite parents to write a letter to me about their child. Some parents send a handwritten or typed letter.  Others send an e-mail.  I ask the parents to share any special information they think I might want to know about their child.  What are their child's likes, dislikes, strengths, and challenges?   Have they had any special trips or experiences that are unique?  I ask parents to tell me what their goals are for their child and what they expect from me. Parents often enjoy writing about their kids and they appreciate the opportunity to have a voice.  I explain that this information helps me to get to know my students personally but also gives me ideas to help the students with writing topics in the future.  I keep these letters to refer to throughout the year.  When a child is stuck and can't think of anything to write about, I have some ideas to help.  I try to follow up  with a personal e-mail to the parents.  I let them know I received the letter and also mention something interesting that was shared.  Again, parents appreciate being heard.  The personal response lets them know you are listening.  It doesn't take that long to send a quick e-mail.  Since most of these letters come in rather staggered the first couple of weeks of school, I only have to respond to a few each evening.

Another way to build positive relationships with families is to send postcards.  I make address labels at the beginning of the year for each student.  Then I attach one label to a postcard.  I use the cards to send a quick positive note home.  You can thank a child for being a great leader in class, for sharing their writing ideas, for doing well on a math test…  There are so many opportunities to use these cards. The students LOVE getting mail and the parents appreciate the positive communication.


Although the next idea takes some planning, it's worth it.  Each month I host one parent or family meeting in the evening.  The topics cover a wide range of things from daily routines and class expectations at the beginning of the year to a family science night later in the year.  Here's a list of the topics and meetings I host each year.
parent night list
Although it does take some time to plan and organize each meeting, once I have the structure and idea, I can use the same material each year.  It's much easier to implement when I have thought out what I want to do and say.

Here are links to some resources I use for family math night and family science night.


Give parents an inside look at your teaching methods with apps like Educreations.  I have created numerous short videos that explain what we are working on in math and how parents can help at home.  I know there are other apps and programs available as well.  Again, there is some work to do up front but once these videos are created, you can use them from year to year.

Our math series provides school to home connection letters for each chapter.  I make sure and utilize these so that parents stay informed.  I created similar letters for some of our language arts standards. This is another way that I keep parents informed.

Most teachers send a monthly newsletter and/or weekly update about what is happening at school and in the classroom.  These should be foundational things that take place in every classroom.  As a parent myself, I always appreciated getting communication from my son's teachers.

I think the key to positive parent partnerships is frequent and consistent communication.  When parents feel supported and informed, they are more likely to be receptive to communication from you that might not be so positive.  The bottom line is to follow "The Golden Rule" with parents.  Treat them as you, as a parent, would want to be treated.

How do you build positive parent partnerships?  What tips can you share?

Friday, March 24, 2017

Second Grade Science Day

What do you do the day before spring break?  Have a science day!  Let's face it.  The day before spring break everyone is ready for a break.  My second grade colleagues and I decided that we would try this out and it was awesome!

There are 5 second grade teachers in my building.  We each planned a fun science activity that would take about 45 minutes to complete.  The activities we picked were ones that focused on second grade science standards.  In my class, the students made marshmallow shooters as we learned about force and motion.

The students came in this morning to the tune of Thomas Dolby's "She Blinded Me with Science." For morning work, they used their iPads to draw a scientist on Doodle Buddy.  They were so excited!

We spent the whole day doing fun activities that met our science standards.  The students rotated from room to room while the teachers stayed in their own rooms.  When we did have a little down time, we watched a Bill Nye video on inventions.
That's me on the right and one of my colleagues on the left.
I enjoyed working with all of the second grade classes.  Plus, it was kind of nice to get a break from my own "little darlings."  You know what I mean??  I have empathy for my coworkers and they have empathy for me!  Anyhoo, the whole day was a blast.  We want to do it again next year!

Do you do anything fun on the last day before spring break?  What kind of "special days" do you do at your school?

Sunday, March 19, 2017

5 Tips to Increase Vocabulary Instruction

I recently read a quote that tied 80% of students' reading comprehension test scores directly to knowledge of vocabulary.  Unfortunately, this hasn't translated into increased vocabulary instruction in most schools.  Despite the obvious positive impact vocabulary instruction may have on student success, many classroom teachers say they don't have the time to fit it in. Although I am certainly NOT an expert, I have learned a few tricks to increase vocabulary instruction in my classroom.

1) Word of the Week- Students find words of interest in their reading and write those words on index cards.  Each week, I select 2 words that become our "Words of the Week."  We learn the meaning of the words and try to use the words in our conversations and writing.  From the words we have chosen, we make a class book to use as a resource in future writings.


2) Focus on Prefixes and Suffixes- We learn word parts throughout the year and often have them posted on the board.  We make lists of words that have the same prefix or suffix. Students love to find prefixes and suffixes in their reading and point them out to others.

3) Student Word Collectors- Each student has a book in his or her book box that is a "Word Collector." When interesting words are found, they are written in the student's personal book.  These books are used as references for writing, reading, and spelling.


4) Teach "Expand Vocabulary"- I use The Daily 5 and The Cafe frameworks in my classroom.  The E in Cafe stands for "Expand Vocabulary."  Under this heading, I teach the students several strategies for learning unknown words and expanding their vocabularies.

5) Model Through Think Alouds- It's important for students to see how we as adults utilize the skills we teach.  When reading to students, let them see you "get stuck" on a word and work through the process of figuring it out.  Be sure to explain your thinking so that students can apply the same process on their own.

6) Poem of the Week- We have one poem that we read everyday for a week.  The main purpose of this is for fluency, but we also use it for phonics, spelling, and vocabulary instruction.  Poems often have rich vocabulary words that can be hi-lighted and studied closely.


Knowing that vocabulary acquisition is so important to the success of my students keeps me looking for ways to improve my own instruction.  What tips can you share for vocabulary instruction?

Monday, March 13, 2017

March Math Madness

Just a quick post to let you know about some great freebies!  I have linked up with Chalkboard Creations  to share some free math games.  There are actually 2 posts.  One is for K-2 and the other is for 3-5.  Check it out!  Who doesn't love free stuff?  Click on the link below!


Saturday, March 11, 2017

Chew and Chat- Building Class Community

Lunch is my favorite part of the day for lots of reasons.  I'll spare you the majority of them and just focus on one- building class community.  Twice a month I have lunch in the classroom with 4 students. It's a time to bond and get to know each other better.  We call it "Chew and Chat."

I randomly select 2 students who each get to invite a friend.  I give them written invitations to attend.  You can download them here:

I set up our little cafe in the classroom.  It does give it a special feeling to add a few details.  We eat lunch together and talk.  I actually really enjoy it (and I treasure my lunch break with my colleagues)!

I enjoy "Chew and Chat" because it gives me a chance to connect with the kids on a different level.  I find out little tidbits of their lives that I would otherwise never know.  Students who are too shy to speak in class often open up in this setting.


I have created these conversation starter cards to use during this lunch time or any time!  You might also use them as prompts for writing, especially opinion writing.


What are some ways you develop class community in your classroom or school?